


목차
1. 서문
2. 구상
3. NavigationField
3.1. 네비게이션 메시 빌드
3.2. 군중(dtCrowd) 업데이트
4. NavigationAgent
4.1. 유닛 상태 설정
4.2. 유닛 이동 명령
1. 서문
이 글에서는 RecastNavigation 라이브러리의 함수와 기능을 내 게임 엔진에 이식한 결과를 소개한다.
2. 구상
내 게임엔진의 클라이언트 프로그램은 RecastNavigation 라이브러리가 어떤 녀석인지 전혀 몰라도 길찾기 기능을 사용할 수 있어야 한다.

버텍스 좌표와 인덱스 좌표를 받아 네비게이션 필드를 만드는 NavigationField 클래스와 이동 명령을 받고 길을 찾아 움직이는 NavigationAgent 클래스만 만들어 주면 클라이언트 입장에서 손쉽게 활용이 가능할 것이다.
3. NavigationField
#pragma once
#include "YunutyEngine.h"
#include "Component.h"
#include "Vector3.h"
#include <vector>
#include <assert.h>

#ifdef YUNUTY_EXPORTS
#define YUNUTY_API __declspec(dllexport)
#else
#define YUNUTY_API __declspec(dllimport)
#endif

namespace yunutyEngine
{
    class NavigationAgent;
    class YUNUTY_API NavigationField : public Component
    {
    public:
        class Impl;
        struct BuildSettings
        {
            // 길찾기 주체들의 최대 개체수
            int maxCrowdNumber{ 1024 };
            // 길찾기 주체들의 최대 충돌반경
            float maxAgentRadius{ 0.6 };
            // 오를수 있는 경사
            float walkableSlopeAngle{ 30 };
            // 오를 수 있는 단차
            float walkableClimb{ 0.2 };
            // 천장의 최소 높이
            float walkableHeight{ 0.3 };
            // x축,z축 공간 분할의 단위, 단위가 작을수록 판정이 더 세밀해지지만, 네비게이션 빌드와 길찾기 시스템의 부하가 늘게 된다.
            float divisionSizeXZ{ 0.3 };
            // y축 공간 분할의 단위, 단위가 작을수록 판정이 더 세밀해지지만, 네비게이션 빌드와 길찾기 시스템의 부하가 늘게 된다.
            float divisionSizeY{ 0.2 };
            // 공간 분할은 xz축으로 250*330, y축으로 200개 정도 분할되는 정도면 순식간에 네비게이션 빌드도 되면서 길찾기도 무리없이 하게 되는 정도다.
            // xz축으로 743* 989개 정도 분할이 되도 큰 부하는 없다.
        };
        NavigationField();
        virtual ~NavigationField();
        virtual void Update();
        void BuildField(const float* worldVertices, size_t verticesNum, const int* faces, size_t facesNum, const BuildSettings& buildSettings = BuildSettings{});
        void BuildField(std::vector<Vector3f> worldVertices, std::vector<int> faces, const BuildSettings& buildSettings = BuildSettings{})
        {
            static_assert(sizeof(Vector3f) == sizeof(float) * 3);
            assert(!worldVertices.empty() && !faces.empty());
            assert(faces.size() % 3 == 0);
            BuildField(reinterpret_cast<float*>(&worldVertices[0]), worldVertices.size(), &faces[0], faces.size() / 3, buildSettings);
        }
    private:
        Impl* impl{ nullptr };
        friend NavigationAgent;
    };
}
( YunutyNavigationField.h )
#pragma once
#include "YunutyNavigationField.h"
#include "Recast.h"
#include "DetourNavMesh.h"
#include "DetourNavMeshBuilder.h"
#include "DetourNavMeshQuery.h"
#include "DetourCrowd.h"

namespace yunutyEngine
{
    // Impl은 그저 데이터만 쌓아두는 곳으로 쓴다.
    class NavigationField::Impl
    {
    private:
        Impl(NavigationField* navFieldComponent) :navFieldComponent(navFieldComponent)
        {
            navQuery = dtAllocNavMeshQuery();
            crowd = dtAllocCrowd();
            context = std::make_unique<rcContext>(rcContext());
        }
        virtual ~Impl()
        {
            dtFreeCrowd(crowd);
            dtFreeNavMeshQuery(navQuery);
        }
        friend NavigationField;
    public:
        NavigationField* navFieldComponent;

        std::unique_ptr<rcContext> context;
        rcPolyMesh* polyMesh;
        rcConfig config;
        rcPolyMeshDetail* polyMeshDetail;
        class dtNavMesh* navMesh;
        class dtNavMeshQuery* navQuery;
        class dtCrowd* crowd;
    };
}
( YunutyNavigationFieldImpl.h )
NavigationField 클래스는 클라이언트에게 헤더파일이 노출되는 클래스이다. 클라이언트 개발자는 구태여 RecastNavigation의 존재를 알 필요가 없기 때문에 RecastNavigation과 관련된 선언은 따로 이너 클래스 Impl을 만들어 그 안에 집어 넣는다.
3.1. 네비게이션 메시 빌드
void yunutyEngine::NavigationField::BuildField(const float* worldVertices, size_t verticesNum, const int* faces, size_t facesNum, const BuildSettings& buildSettings)
{
float bmin[3]{ std::numeric_limits<float>::max(),std::numeric_limits<float>::max(),std::numeric_limits<float>::max() };
float bmax[3]{ -std::numeric_limits<float>::max(),-std::numeric_limits<float>::max(),-std::numeric_limits<float>::max() };
// 바운더리 정보부터 설정
for (auto i = 0; i < verticesNum; i++)
{
if (bmin[0] > worldVertices[i * 3])
bmin[0] = worldVertices[i * 3];
if (bmin[1] > worldVertices[i * 3 + 1])
bmin[1] = worldVertices[i * 3 + 1];
if (bmin[2] > worldVertices[i * 3 + 2])
bmin[2] = worldVertices[i * 3 + 2];
if (bmax[0] < worldVertices[i * 3])
bmax[0] = worldVertices[i * 3];
if (bmax[1] < worldVertices[i * 3 + 1])
bmax[1] = worldVertices[i * 3 + 1];
if (bmax[2] < worldVertices[i * 3 + 2])
bmax[2] = worldVertices[i * 3 + 2];
}
auto& config{ impl->config };
memset(&config, 0, sizeof(rcConfig));
config.cs = buildSettings.divisionSizeXZ;
config.ch = buildSettings.divisionSizeY;
config.walkableSlopeAngle = buildSettings.walkableSlopeAngle;
config.walkableHeight = (int)ceilf(buildSettings.walkableHeight / config.ch);
config.walkableClimb = (int)floorf(buildSettings.walkableClimb / config.ch);
config.walkableRadius = (int)ceilf(config.cs * 2 / config.cs);
config.maxEdgeLen = (int)(config.cs * 40 / config.cs);
config.maxSimplificationError = 1.3f;
config.minRegionArea = (int)rcSqr(config.cs * 27); // Note: area = size*size
config.mergeRegionArea = (int)rcSqr(config.cs * 67); // Note: area = size*size
config.maxVertsPerPoly = (int)6;
config.detailSampleDist = 6.0f < 0.9f ? 0 : config.cs * 6.0f;
config.detailSampleMaxError = config.ch * 1;
rcVcopy(config.bmin, bmin);
rcVcopy(config.bmax, bmax);
rcCalcGridSize(config.bmin, config.bmax, config.cs, &config.width, &config.height);
// 작업 맥락을 저장할 context 객체 생성, 작업의 성패여부를 저장할 processResult 선언
auto* context = impl->context.get();
bool processResult{ false };
// 복셀 높이필드 공간 할당
rcHeightfield* heightField{ rcAllocHeightfield() };
assert(heightField != nullptr);
processResult = rcCreateHeightfield(context, *heightField, config.width, config.height, config.bmin, config.bmax, config.cs, config.ch);
assert(processResult == true);
std::vector<unsigned char> triareas;
triareas.resize(facesNum);
//unsigned char * triareas = new unsigned char[facesNum];
//memset(triareas, 0, facesNum*sizeof(unsigned char));
rcMarkWalkableTriangles(context, config.walkableSlopeAngle, worldVertices, verticesNum, faces, facesNum, triareas.data());
processResult = rcRasterizeTriangles(context, worldVertices, verticesNum, faces, triareas.data(), facesNum, *heightField, config.walkableClimb);
assert(processResult == true);
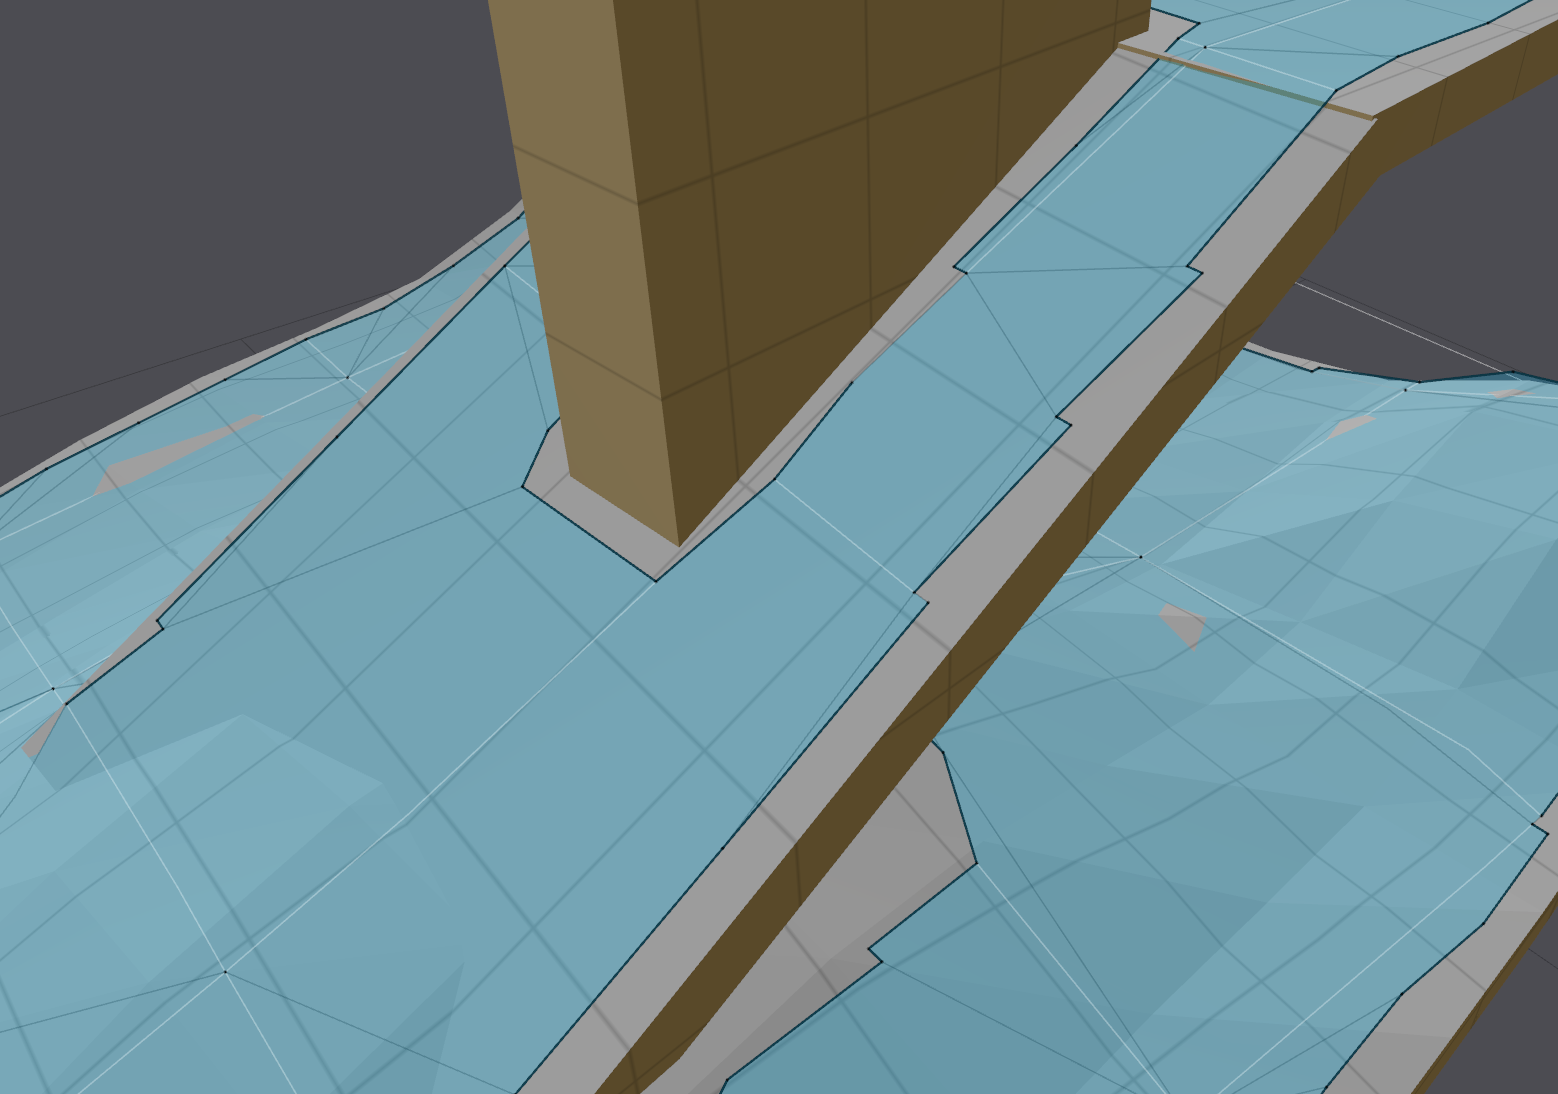
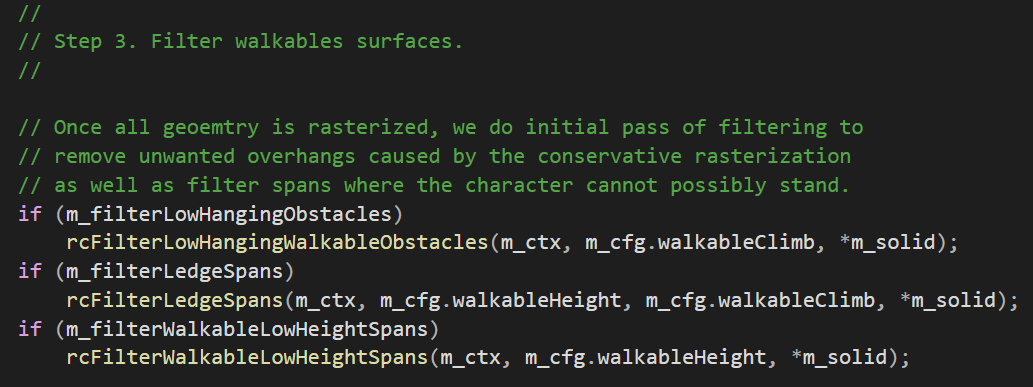
// 필요없는 부분 필터링
rcFilterLowHangingWalkableObstacles(context, config.walkableClimb, *heightField);
rcFilterLedgeSpans(context, config.walkableHeight, config.walkableClimb, *heightField);
rcFilterWalkableLowHeightSpans(context, config.walkableHeight, *heightField);
// 밀집 높이 필드 만들기
rcCompactHeightfield* compactHeightField{ rcAllocCompactHeightfield() };
assert(compactHeightField != nullptr);
processResult = rcBuildCompactHeightfield(context, config.walkableHeight, config.walkableClimb, *heightField, *compactHeightField);
//rcFreeHeightField(heightField);
assert(processResult == true);
//processResult = rcErodeWalkableArea(context, config.walkableRadius, *compactHeightField);
//assert(processResult == true);
processResult = rcBuildDistanceField(context, *compactHeightField);
assert(processResult == true);
rcBuildRegions(context, *compactHeightField, 0, config.minRegionArea, config.mergeRegionArea);
assert(processResult == true);
// 윤곽선 만들기
rcContourSet* contourSet{ rcAllocContourSet() };
assert(contourSet != nullptr);
processResult = rcBuildContours(context, *compactHeightField, config.maxSimplificationError, config.maxEdgeLen, *contourSet);
assert(processResult == true);
// 윤곽선으로부터 폴리곤 생성
rcPolyMesh*& polyMesh{ impl->polyMesh = rcAllocPolyMesh() };
assert(polyMesh != nullptr);
processResult = rcBuildPolyMesh(context, *contourSet, config.maxVertsPerPoly, *polyMesh);
assert(processResult == true);
// 디테일 메시 생성
auto& detailMesh{ impl->polyMeshDetail = rcAllocPolyMeshDetail() };
assert(detailMesh != nullptr);
processResult = rcBuildPolyMeshDetail(context, *polyMesh, *compactHeightField, config.detailSampleDist, config.detailSampleMaxError, *detailMesh);
assert(processResult == true);
//rcFreeCompactHeightfield(compactHeightField);
//rcFreeContourSet(contourSet);
// detour 데이터 생성
unsigned char* navData{ nullptr };
int navDataSize{ 0 };
assert(config.maxVertsPerPoly <= DT_VERTS_PER_POLYGON);
// Update poly flags from areas.
for (int i = 0; i < polyMesh->npolys; ++i)
{
if (polyMesh->areas[i] == RC_WALKABLE_AREA)
{
polyMesh->areas[i] = 0;
polyMesh->flags[i] = 1;
}
}
dtNavMeshCreateParams params;
memset(¶ms, 0, sizeof(params));
params.verts = polyMesh->verts;
params.vertCount = polyMesh->nverts;
params.polys = polyMesh->polys;
params.polyAreas = polyMesh->areas;
params.polyFlags = polyMesh->flags;
params.polyCount = polyMesh->npolys;
params.nvp = polyMesh->nvp;
params.detailMeshes = detailMesh->meshes;
params.detailVerts = detailMesh->verts;
params.detailVertsCount = detailMesh->nverts;
params.detailTris = detailMesh->tris;
params.detailTriCount = detailMesh->ntris;
params.offMeshConVerts = 0;
params.offMeshConRad = 0;
params.offMeshConDir = 0;
params.offMeshConAreas = 0;
params.offMeshConFlags = 0;
params.offMeshConUserID = 0;
params.offMeshConCount = 0;
params.walkableHeight = config.walkableHeight;
params.walkableRadius = config.walkableRadius;
params.walkableClimb = config.walkableClimb;
rcVcopy(params.bmin, polyMesh->bmin);
rcVcopy(params.bmax, polyMesh->bmax);
params.cs = config.cs;
params.ch = config.ch;
params.buildBvTree = true;
processResult = dtCreateNavMeshData(¶ms, &navData, &navDataSize);
assert(processResult == true);
dtNavMesh* navMesh{ impl->navMesh = dtAllocNavMesh() };
assert(navMesh != nullptr);
dtStatus status;
status = navMesh->init(navData, navDataSize, DT_TILE_FREE_DATA);
//dtFree(navData);
assert(dtStatusFailed(status) == false);
dtNavMeshQuery* navQuery{ impl->navQuery };
status = navQuery->init(navMesh, 2048);
assert(dtStatusFailed(status) == false);
impl->crowd->init(1024, buildSettings.maxAgentRadius, navMesh);
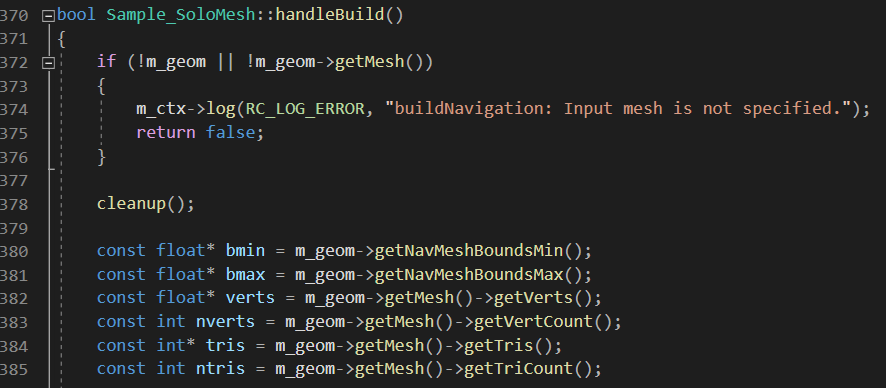
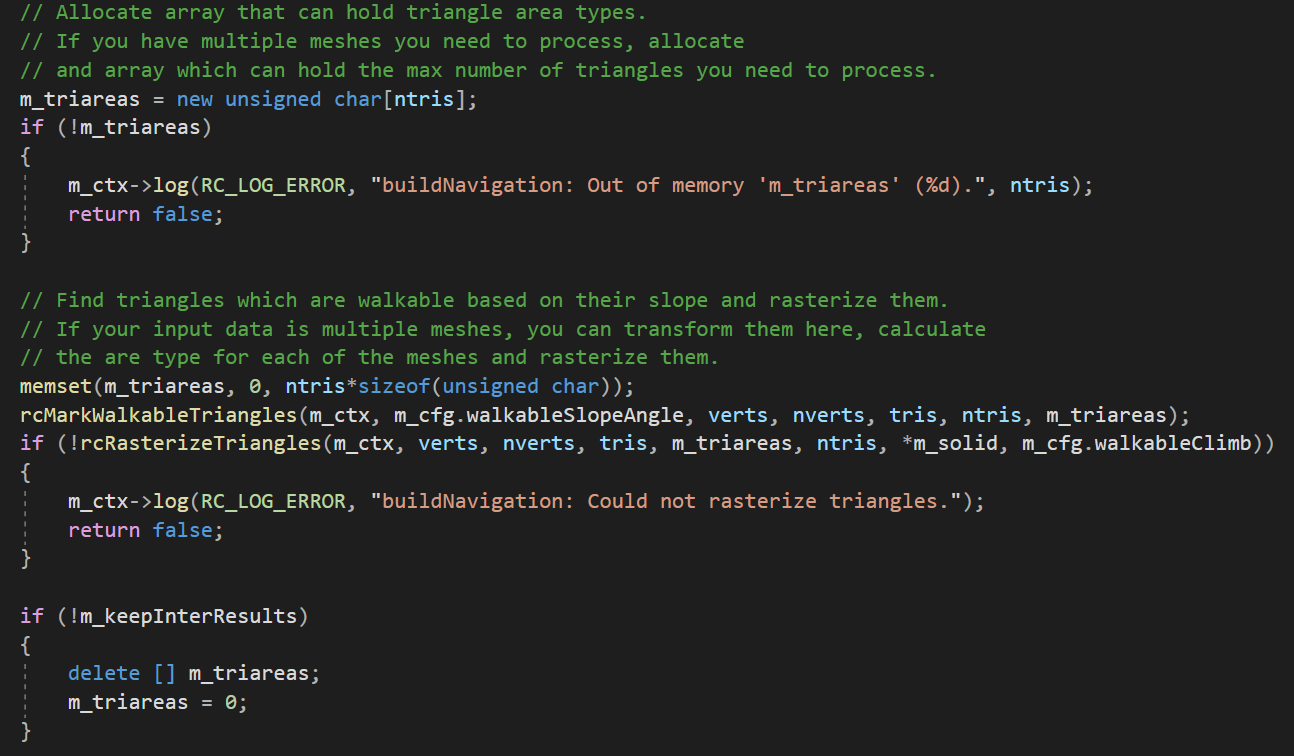
}( YunutyNavigationField.cpp의 BuildField 함수 )
네비게이션 메시 빌드 함수는 버텍스 정보와 페이스 정보를 매개변수로 받아 동작하도록 만들었다. 그 외의 부분은 RecastDemo 프로젝트의 빌드 코드를 거의 복사해서 붙여넣었다. 실패는 용납할 수 없기 때문에 빌드과정에서 차질이 있거나(dtStatusFailed(status)) 객체가 제대로 생성되지 않았을 경우(navMesh...etc !=nullptr)바로 런타임 에러를 일으킬 수 있도록 assert를 박았다.
- 페이스를 구성하는 인덱스들은 세 점을 이어 화살표를 만들었을 때 시계방향으로 도는 모양이 되어야 한다. 외적연산을 통해 도출되는 평면의 수직방향이 중요하게 취급되기 때문이다.
- polyMesh는 밟을 수 있는 평면들(polygon)에 대한 정보를 담고 있다. 각 평면들의 필터는 반드시 0이 아닌 값이 들어가야 한다. NavigationAgent는 통행할 수 있는 평면들을 필터링하기 위해 논리곱 비트플래그 연산(&)을 사용하는데 평면의 필터값이 0이면 참 값이 반환될수가 없다. 이 필터링 동작을 간과한 것 때문에 족히 여섯시간을 날렸다.
3.2. 군중(dtCrowd) 업데이트
void yunutyEngine::NavigationField::Update()
{
    if (impl->crowd == nullptr)
        return;

    impl->crowd->update(yunutyEngine::Time::GetDeltaTime(), nullptr);
}
( YunutyNavigationField.cpp의 코드 )
네비게이션 메시 위에서 dtAgent들이 돌아다니려면, dtAgent들의 집합인 dtCrowd의 업데이트 함수를 불러줘야 한다. 유닛들의 이동은 서로가 서로의 상태에 의해 영향을 받기 때문에 유닛별로 업데이트를 시키는 것이 아니라 군중에 대해 업데이트를 시키는 것이다. 매 게임엔진 업데이트 주기마다 프레임간 시간 간격을 매개변수로 군중의 이동 상태를 업데이트해준다.
4.NavigationAgent
#pragma once
#include "Vector3.h"
#include "Component.h"

#ifdef YUNUTY_EXPORTS
#define YUNUTY_API __declspec(dllexport)
#else
#define YUNUTY_API __declspec(dllimport)
#endif

namespace yunutyEngine
{
    class NavigationField;
    class YUNUTY_API NavigationAgent : public Component
    {
    public:
        class Impl;
        NavigationAgent();
        virtual ~NavigationAgent();
        virtual void Update();
        void AssignToNavigationField(NavigationField* navField);
        void SetSpeed(float speed);
        void SetAcceleration(float accel);
        void SetRadius(float radius);
        const Vector3f& GetTargetPosition();
        float GetSpeed();
        float GetAcceleration();
        float GetRadius();
        void MoveTo(Vector3f destination);
        void MoveTo(Vector3d destination) { MoveTo(Vector3f{ destination }); }
    private:
        Impl* impl;
        NavigationField* navField;
        friend NavigationField;
    };
}
( YunutyNavigationAgent.h )
#pragma once
#include "DetourCrowd.h"
#include "YunutyNavigationAgent.h"

namespace yunutyEngine
{
    class NavigationAgent::Impl
    {
    private:
        Impl(NavigationAgent* navAgentComponent) :navAgentComponent(navAgentComponent)
        {
            navAgentComponent = navAgentComponent;
        }
        virtual ~Impl()
        {
            if (crowd != nullptr && agentIdx != -1)
                crowd->removeAgent(agentIdx);
        }
        friend NavigationAgent;
    public:
        int agentIdx{-1};
        //const dtCrowdAgent* agent{ nullptr };
        dtCrowd* crowd{ nullptr };
        dtPolyRef targetRef;
        float targetPos[3];
        dtCrowdAgentParams agentParams
        {
            .radius = 1,
            .height = 0.3,
            .maxAcceleration = std::numeric_limits<float>::max(),
            .maxSpeed = 5,
            .collisionQueryRange = 12,
            .pathOptimizationRange = 30,
            .separationWeight = 2,
            .updateFlags = DT_CROWD_ANTICIPATE_TURNS |
            DT_CROWD_OPTIMIZE_VIS |
            DT_CROWD_OBSTACLE_AVOIDANCE,
            .obstacleAvoidanceType = (unsigned char)3,
        };
        NavigationAgent* navAgentComponent;
    };
}
( YunutyNavigationAgentImpl.h )
NavigationAgent도 마찬가지로 RecastDetour와 관련된 선언은 게임엔진의 사용자에게 노출되지 않는 Impl 클래스의 헤더에 넣는다.
4.1. 유닛 상태 설정
void yunutyEngine::NavigationAgent::SetSpeed(float speed)
{
    impl->agentParams.maxSpeed = speed;
    if (impl->crowd != nullptr)
        impl->crowd->updateAgentParameters(impl->agentIdx, &impl->agentParams);
}
void yunutyEngine::NavigationAgent::SetAcceleration(float accel)
{
    impl->agentParams.maxAcceleration = accel;
    if (impl->crowd != nullptr)
        impl->crowd->updateAgentParameters(impl->agentIdx, &impl->agentParams);
}
void yunutyEngine::NavigationAgent::SetRadius(float radius)
{
    impl->agentParams.radius = radius;
    if (impl->crowd != nullptr)
        impl->crowd->updateAgentParameters(impl->agentIdx, &impl->agentParams);
}
( YunutyNavigationAgent.cpp의 코드 중 일부 )
네비게이션 메시에 배치된 유닛들은 각자 충돌크기, 속도와 가속도를 다르게 가질 수 있다. 이런 정보를 바꿀 수 있게 인터페이스를 뚫어주고 값이 바뀔때마다 crowd->updateAgentParameters 함수를 불러준다.
4.2. 유닛 이동 명령
void yunutyEngine::NavigationAgent::MoveTo(Vector3f destination)
{
if (navField == nullptr)
return;
const dtQueryFilter* filter{ impl->crowd->getFilter(0) };
const dtCrowdAgent* agent = impl->crowd->getAgent(impl->agentIdx);
const float* halfExtents = impl->crowd->getQueryExtents();
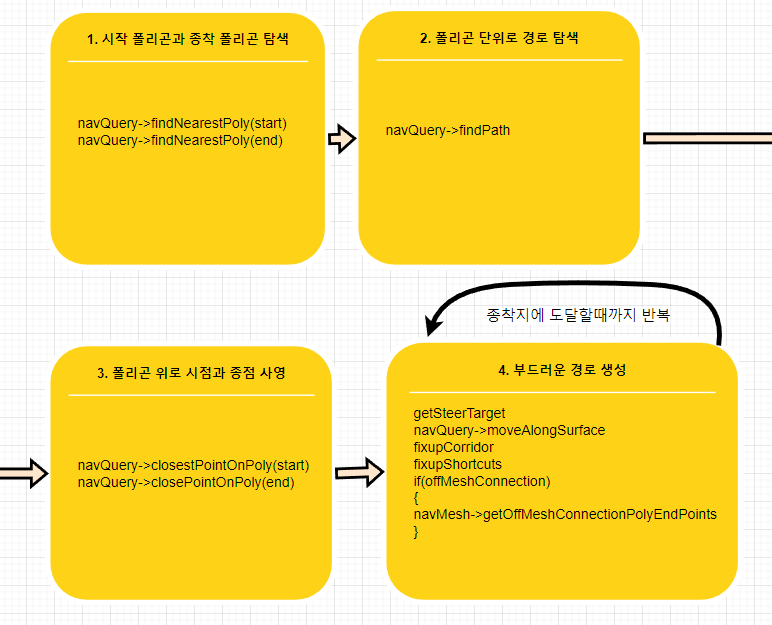
navField->impl->navQuery->findNearestPoly(reinterpret_cast<float*>(&destination), halfExtents, filter, &impl->targetRef, impl->targetPos);
impl->crowd->requestMoveTarget(impl->agentIdx, impl->targetRef, impl->targetPos);
}( YunutyNavigationAgent.cpp의 코드 중 MoveTo 함수 )
유닛에게 이동 명령을 내릴 때는 명령의 대상지점으로부터 가장 가까운 접근가능지점을 찾아 그 위치에 requestMoveTarget 함수를 호출하면 된다. NavigationAgent클래스의 역할은 이렇게 유닛의 상태를 바꾸는 것 뿐이고, 유닛의 상태에 따라 위치정보를 업데이트하는 것은 NavigationField 클래스의 역할이 된다.
5. 테스트 예제 코드
void CreateNavPlane(Vector3f botleft, Vector3f topright, std::vector<Vector3f>& worldVertices, std::vector<int>& worldFaces)
{
    int startingIdx = worldVertices.size();
    worldVertices.push_back({ botleft.x,0,topright.z });
    worldVertices.push_back({ botleft.x,0,botleft.z });
    worldVertices.push_back({ topright.x,0,botleft.z });
    worldVertices.push_back({ topright.x,0,topright.z });

    worldFaces.push_back(startingIdx + 2);
    worldFaces.push_back(startingIdx + 1);
    worldFaces.push_back(startingIdx + 0);
    worldFaces.push_back(startingIdx + 3);
    worldFaces.push_back(startingIdx + 2);
    worldFaces.push_back(startingIdx + 0);

    auto tilePlane = yunutyEngine::Scene::getCurrentScene()->AddGameObject()->AddComponent<DebugTilePlane>();
    auto size = topright - botleft;
    tilePlane->GetTransform()->SetWorldPosition((botleft + topright) / 2.0);
    tilePlane->width = size.x;
    tilePlane->height = size.z;
    tilePlane->SetTiles();
}

NavigationAgent* CreateAgent(NavigationField* navField)
{
    auto agent = yunutyEngine::Scene::getCurrentScene()->AddGameObject()->AddComponent<yunutyEngine::NavigationAgent>();
    agent->SetSpeed(2);
    agent->SetRadius(0.5);
    agent->AssignToNavigationField(navField);
    auto staticMesh = agent->GetGameObject()->AddGameObject()->AddComponent<yunutyEngine::graphics::StaticMeshRenderer>();
    staticMesh->GetGI().LoadMesh("Capsule");
    staticMesh->GetGI().GetMaterial()->SetColor({ 0.75,0.75,0.75,0 });
    staticMesh->GetTransform()->position = Vector3d{ 0,0.5,0 };
    return agent;
}
.....

int main()
{
.....
// 길찾기 테스트
    {
        //auto tilePlane = yunutyEngine::Scene::getCurrentScene()->AddGameObject()->AddComponent<DebugTilePlane>();
        //tilePlane->width = 10;
        //tilePlane->height = 10;
        //tilePlane->SetTiles();

        const float corridorRadius = 3;
        std::vector<Vector3f> worldVertices {
        };
        std::vector<int> worldFaces { };

        CreateNavPlane({ -2,0,-8 }, { 2,0,8 }, worldVertices, worldFaces);
        CreateNavPlane({ -8,0,-2 }, { 8,0,2 }, worldVertices, worldFaces);
        CreateNavPlane({ -8,0,-8 }, { -6,0,8 }, worldVertices, worldFaces);
        CreateNavPlane({ 6,0,-8 }, { 8,0,8 }, worldVertices, worldFaces);
        CreateNavPlane({ -8,0,6 }, { 8,0,8 }, worldVertices, worldFaces);
        CreateNavPlane({ -2,0,-8 }, { 2,0,8 }, worldVertices, worldFaces);
        auto navField = Scene::getCurrentScene()->AddGameObject()->AddComponent<yunutyEngine::NavigationField>();
        navField->BuildField(worldVertices, worldFaces);
        auto agent = CreateAgent(navField);
        auto agent2 = CreateAgent(navField);
        auto agent3 = CreateAgent(navField);
        rtsCam->groundRightClickCallback = [=](Vector3d position) {
            agent->MoveTo(position);
            agent2->MoveTo(position);
            agent3->MoveTo(position);
        };
    }
( main.cpp 코드 )
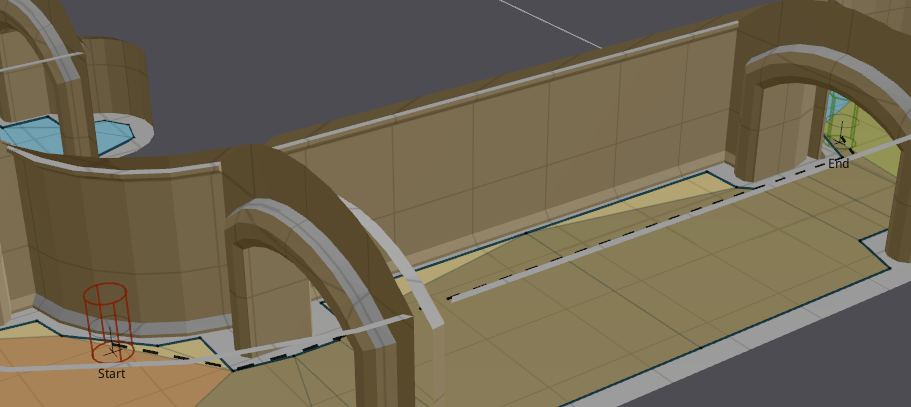
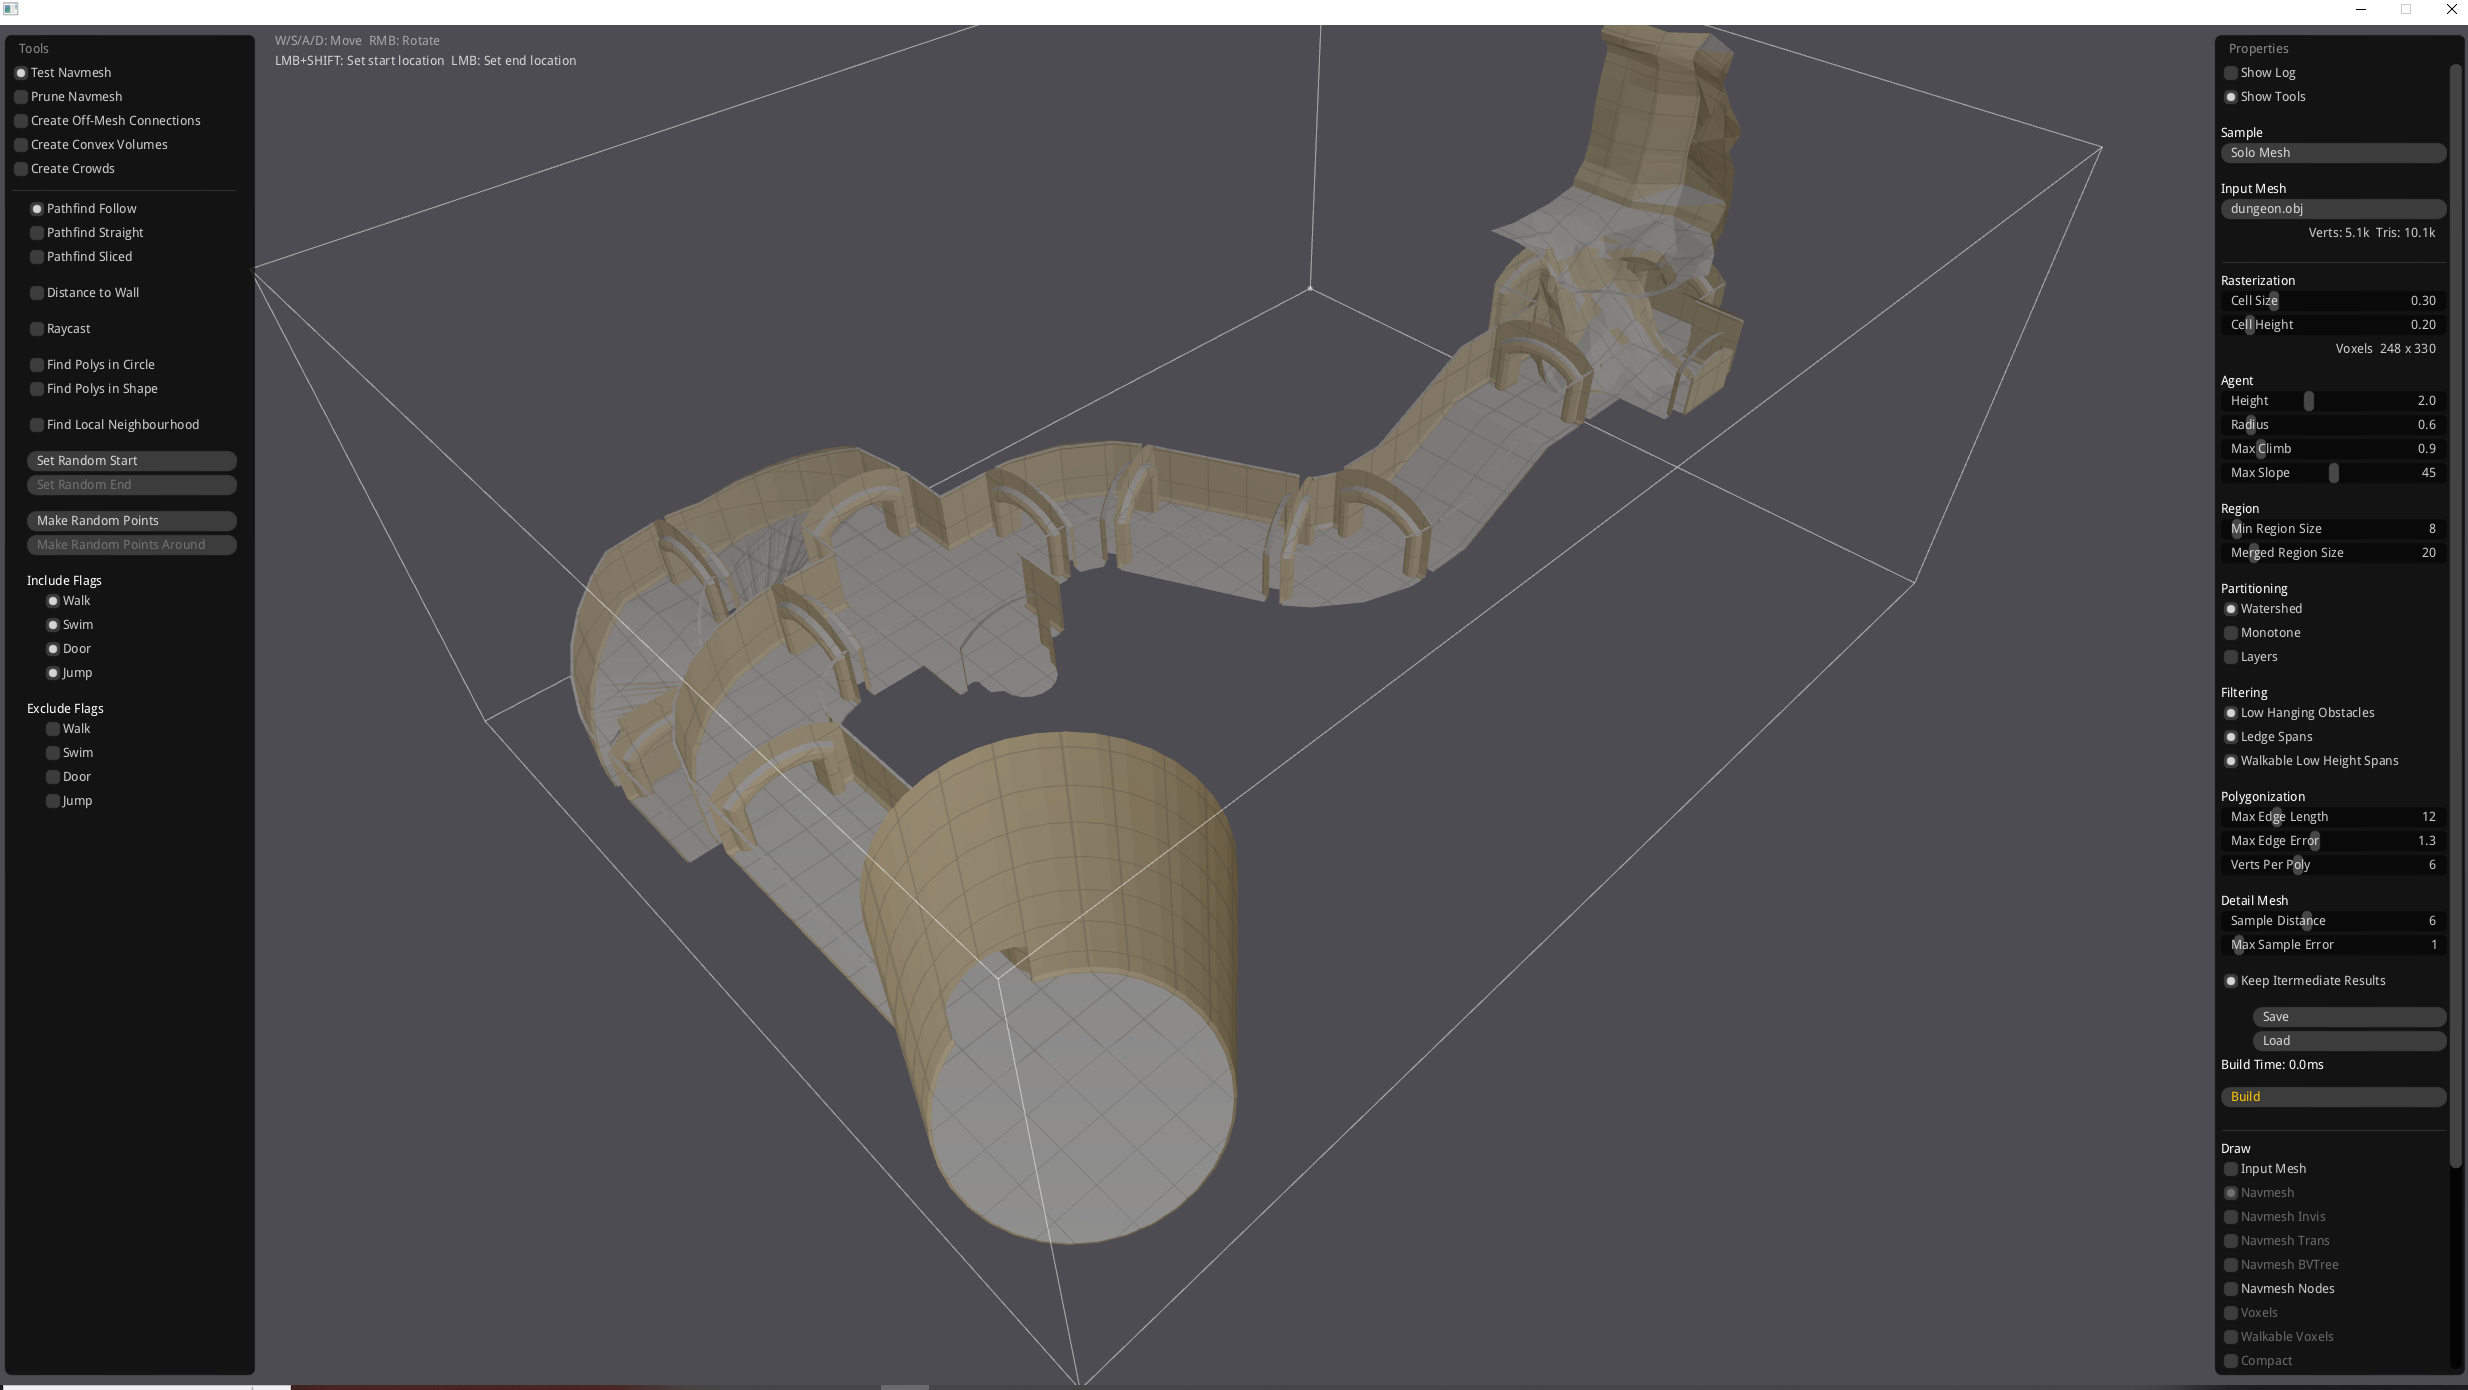
이제 테스트용 코드를 만들어내어 엔진에서 잘 작동하는지 확인해야 한다. CreateNavPlane함수는 사각형 메시의 좌측하단의 점과 우측상단의 점을 매개로 사각형 평면을 만들고 버텍스 정보와 페이스 정보를 추가한다. 이 정보를 토대로 BuildField 함수를 호출하고 완성된 네비게이션 필드에 유닛을 3기 추가시킨다. 평면과 유닛 객체에는 모두 디버그 메시를 달아놓아 그 형체를 구분할 수 있게 하고 화면 우클릭에 해당하는 콜백함수를 달아 유닛의 MoveTo 함수를 호출할 수 있게 한다.
잘 되는 것 같다.
'자체엔진 Yunuty > RecastNavigation' 카테고리의 다른 글
| RecastNavigation - Detour Crowd의 분석 (0) | 2023.10.25 |
|---|---|
| RecastNavigation의 경로계산 (0) | 2023.10.23 |
| RecastNavigation 경로맵 빌드 코드의 분석 (0) | 2023.10.19 |